Friday, 30 December 2016

Wine Bag Tutorial

How-To


Here is the recipe for the wine bottle gift bag:

materials used:

31 cm x 35 cm Haori yarn-dyed cotton fabric for the face
12 cm x 24 cm Haori yarn-dyed cotton fabric for the bottom pieces of the bag
(I used the fabric, used for the face)
31 cm x 43 cm Haori yarn-dyed cotton fabric for the lining
pieces of fabric for desired appliqué (optional)
Haori 100% polyester thread in matching colours
12 cm x 12 cm heavy interfacing
2 cork bottle stoppers
jute cord


prepare the bag: 


1. Prepare all the appliqué pieces that will be used (optional). I machine-stitched a graphic cheese board on an ivory background and used cut-out shape of wine bottle with hand-stitched label, matching the original wine bottle. You could make whatever you are pleased to do, or just sew a plain wine bottle bag.


2. Decide how you would position the appliqués (if used), where the side seem would be and where the openings for the cord would be stitched. Attach the desired designs to the piece of fabric, used for the face. 

Note: Make sure that when folded in the middle, your designs will fall on the side that you want them to be. I wanted the bottle design to fall on the front left bottom "corner"of the bag and the cheese board to cover the back bottom side. The side seem I chose to be on the right side of the bag. The openings for the cord I decided to be on the top left side of the front ( almost opposite to the side seam, so the cork stoppers fall on the left of the appliquéd bottle). If you wish to have the seem on the back, reposition your appliqués. 

3. Cut out the bottom pieces.

These are the exact measurements for the bag I made, using this particular wine bottle. Wine bottles on the market are pretty standard, but make sure that you measure yours first and that these measurements would fit your needs. I made the bag pretty fitted for cleaner look. 

30.5 cm x 34.5 cm (12" x 13.5") face
30.5 cm x 43.0 cm (12" x 17.0") lining
10 cm diametre for the bottom circled pieces


4. With right sides together, pin the face and lining fabric and stitch at the top. Turn them right side(s) out and even the bottom edges in a way, that the lining fabric stands higher then the face fabric. Press with an iron to form the top edge of the bag. This will help you decide where to stitch the holes for the cord. 


5. Hand-stich the openings for the cord on the facing fabric, just below the seam. Use a blanket stitch, open a bit at the bottom, but very closed at the top edge to form a ring. Press.


6. With no steam, iron the interfacing to the piece, that will be stitched to the lining.


7. Open the fabric completely and in half lengthwise, across the existing seam. This will form a long 'sleeve'


8. Stich all the way along the 'sleeve', leaving an opening of 8-10 cm somewhere on the lining piece, closer to the bottom. I worked with 10 mm seam. Trim a bit (to 7 mm seam).


 9. Both ends of the sleeve stay opened, ready to attach the round pieces.


10. Starting with the interfaced piece for the lining, pin all the way from the centre to the edge to keep the piece in place. Stitch. Repeat in a same manner for the other side of the 'sleeve'.


11.  Now you have both openings of the 'sleeve' closed.


12. Turn the 'sleeve right side out through the opening, left on the side of the lining. Press the seams around the closed 'sleeve' openings.


 13. Slipstitch the opening.


14. Holding the ironed top edge that you have formed in step 4, push the bottom of the lining through the 'sleeve' all the way until you meet the bottom piece of the face. Adjust the edges of both round pieces to match. Straighten the sleeve all the way up to form the bag. Press. Because of its skinny shape and round bottom, the bag stays on its own, even when it is empty.  


15. Make the channel for the cord: Stitch over the seam that connects the lining and the facing fabric. Make a seam below the hand-stitched holes for the cord. With seam ripper, gently cut the holes open, without damaging the stitching.

prepare the cord:


1. Use a wide eyed needle, longer than the cork stopper. Thread the needle with the jute cord. Make sure you 'stitch' in the centre of the cork stopper and the needle is going perfectly straight. The cork is a very 'alive' material, it forms a tight hug to any object it is in contact with, that is why the movement of the needle is very hard. You may need to press it against a wooden board. Once the top of the needle starts coming out, pull hard to take it out completely through the cork. It is not an easy task, but possible. Tie a not at the end of the cork stopper. 


2. Cut off the desired length of the cord. I used a long cord, because I wanted to tie it around few times. 


3. Thread the needle with the other end of the cord and very carefully, with the needle as a guide, starting from one of the cord openings on the bag, insert the cord into the sewn casing, going around and ending out the other hand-stitched hole. Pull the cord and attach the second cork stopper. 


4. Tie the bag around the top of the bottle. Make your friends happy!

Cheers, friends! 
♥ Ivelina


Friday, 23 December 2016

Wine Gift Bag

It is almost Christmas - one full day before the bright and happy celebration. We exchange presents, delights, hugs and wine. The meal is always better with a glass of wine and we all have our weird and not so weird preferences when it comes to wine. 


Wine making is an art. And, believe me, the process of making  good wine is a labyrinth - it is never the same for any sort of grape, or for a certain year, or for the conditions of making it. It takes all the   heart and skills, a full devotion and one definitely must love doing that, in order to make a grape juice good enough to be called wine, and at the end, the challenge raises the bar even more, since there is a good wine, and there is, most definitely, a bad wine. White or red, or rosé, wine is an amazing accompaniment to a dish. And the story behind the wine gift bag is about my friend and her love towards a certain white wine, ... and hockey...


My friend is a fellow fabric addicted crazy person. She sews all kinds of things. The love for fabric was what introduced us to this potential (at that time) relationship. When I first met her, I did not look at her, thinking: "hm, she loves fabric, that is why she is here, maybe we'll become friends...". Not at all! Much more, than a love for fabric is needed to find a friend and stay true to them. Through time, we have learned a lot about each other and became very real friends. So, now I get to know her favourite wine, favourite sports player, and  their opposites, of course. 

Canada is a country that prides itself with the hockey game. Hockey is not just a sport here - it is a style of living. I do not believe that there is a family of Canadians, that doesn't have at least one member involved into this sport. The big hockey bags, that carry full equipment for one, start appearing on the streets as early as the beginning of September. You could see little creatures, with tiny bodies, which barely fit properly on their skinny, but very muscle legs, dragging a bag, almost bigger than these creatures themselves, rushing through the parking with a long hockey stick in the other hand, towards the arenas, eager to start the early season practice, because up until this early autumn, that almost feel like late summer, these children have been practicing on their home lawns, staying very true to the Canadian  healthy hockey obsession. And right there, on that instant, you could read the pride and joy in these brightly sparkling eyes. These kids feel alive and happy. Hockey is a big thing to the Canadians. It is the second most important thing that identifies the country, after the national flag. 

My friend, as a true Canadian, and as a hockey mom, loves.. no, better say -  adores hockey as a sport. And of course, she does have a favourite player. When it comes to hockey, she is so full of information, you could learn from her. But when it comes to her favourite player, you could dive and sink into the stories she tells about this guy. And if the hockey were an equation, in which all the players take their places with different value, her player is the never changed constant with the highest value always and the right answer to the question: "Who is the best hockey player of all times?", the one from the present, the nice and shiny, the most handsome and skilled, Canadian born and raised, Sidney Crosby. Although, I don't share the same love for hockey, I truly love her passion for it, learning and trying to be on track (a very difficult task in this dynamic hockey life). There is a constant debate regarding who the best Canadian hockey player is. I remember Wayne Gretzky's name from my childhood - only because my father was a hockey fan. As an adult, and later - Canadian, I got to learn a lot about both players (and others as well). And in the wild competitiveness of the sport, the fans are always arguing who the best player is, and every story has its reasoning, and every fan passionately and argumentatively protects their favourite. Wayne Gretzky is a player, my friend respects a lot, but when it comes to comparison, well, lets just say, there is no evidence that would work in his favour, until Crosby is "in the game".


Choosing the wine from Gretzky's winery was super intentional. I knew she would appreciate the white wine, she would love that it was Riesling (it is her favourite wine), and she would be a smidgen bit "annoyed" by the fact that it was this particular brand. 

I made the bag for her with so much love. I hope she would enjoy the wine at Christmas and the bag will help her keep the good memories from today for quite some time. 

Cheers, my friend! Happy Christmas! 


The bag is made with the Haori handmade yarn dyed 100 % cotton fabric. I will prepare a tutorial of how to make your own in a following post. 


Have you finished your projects? Did you make anything special for your friend? I have to admit, I have two projects, that I packed and put away for next year, unfinished. I made sure I wrote a detailed note with drawings attached, so I have my ideas vividly alive next year and I finish them then. I am a little bit sad and a lot more disappointed in myself, but I guess, I overestimated the time and skills I possess.  

Have a wonderful, happy, healthy, memorable Christmas celebration! Thank you for taking the time to share some emotions and makings. Stay true to yourselves! 

Until soon,
♥ IN

Wednesday, 14 December 2016

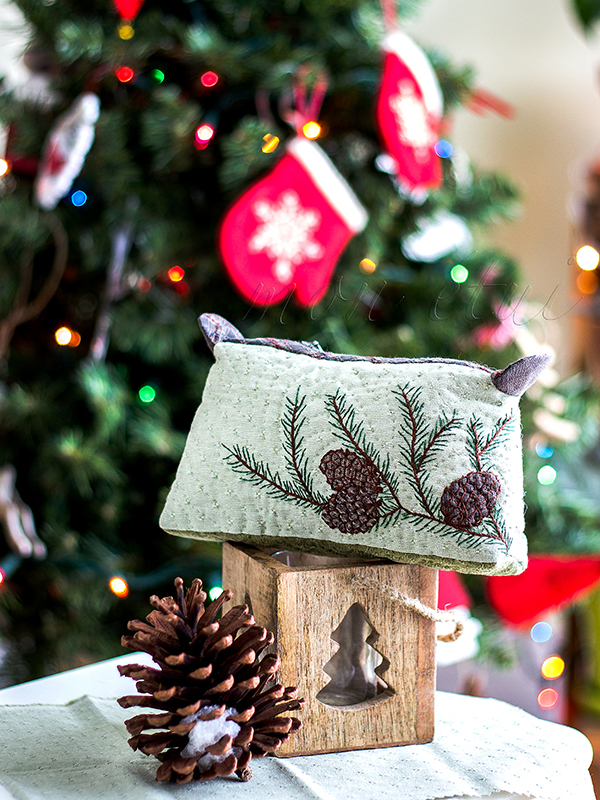
' I love winter ' Pouch

The real winter has just arrived! It is getting colder every day. I hope we have a White Christmas this year! With all the festively decorated houses, pure white snow makes it magical, reflecting the colourful lights. It really is 'the most beautiful time of the year!


I made this appliquéd little pouch to celebrate the beautiful winter we are having... And I have to admit - I love, love, love it!!!  (Both :))

materials used:

* All three types of fabric, used in the pouch are from the green yarn-dyed Haori collection.
* Bias tape from Haori
* Haori thread in colour green
* for the appliqué: pieces from Haori pre-cut quilting size: 7cm x 7cm
* embroidery floss


I was prepared to carry all the materials in "Mon étui" needle case. We were going on a long trip. I did not want to waste any time and my plan was to start working on the pouch in the car and during the trip. Due to unfortunate circumstances, we had to come back home much earlier than anticipated. Time was enough only to design the appliqué and decide on what type of pouch I am going to make. 

Designing the appliqué picture was the hardest. I drew it three times, before I was satisfied with the result. 


The pinecones were attached to the fabric with slipstitch. I used stem stitch for the branch. To achieve the texture of the pinecones, I had to 'investigate' how to draw a pine cones - what details are important, so I could represent them with my needle and thread. I used a blanket stitch, but with modification, that made it in a pentagonal shape. 


It was a great adventure to make this winter pouch. And I really mean 'adventure' since my right hand fingers now hurt, completely covered in painful marks, left from the needle. Well..., maybe a use of a thimble would have helped, if I only accepted that a little discomfort of having a thimble on my finger would safe me from experiencing the pinching pain afterwords.


I am on a journey to learn as much as possible from Yoko Saito. She is such an inspiration! Her creations are story-telling and always capture the moods of the Nature. Making this pouch, helped me realize how much hard work stays behind every single little (or big) project of hers. Most of the work includes hand-stitching and this affects our understanding of quilting as a textile art. The Japanese quilting is a whole different novel. The products have so much more texture and most of the time, they require hand-embroidery. 


Haori fabric is perfect for quilting. The fabric has a character - it comes with the texture already. It only needs to be molded into a piece, that would represent the maker's mood at the time. 


It was really easy to hand-quilt on the pouch. I quilted the face, following the appliquéd pattern (around the pine cones and the branches). For the bottom and the back of the pouch, I followed the pattern of the fabric weave. This allowed me to have more interesting effect, since none of the sides looks the same. 


Following the weave of the fabric, used for the back of the pouch was easy and fun. It looks as if I embroidered the small crosses, where the rhombs meet, but that actually was what guided me through my stitching. I did not have to draw guiding lines. 


Ten days till Christmas! I think I have to focus on some baking. If you do not see me here soon, you have to know that I am in the kitchen mixing, rolling, cutting, baking and making the whole house smell deliciously. 

With a hint of cinnamon and fresh orange zest, I wish you happy days of preparation for Christmas. Mine will certainly be busy. 


♥ IN


Monday, 12 December 2016

Autumn Scarf

My autumn 🍂 coloured scarf comes to help in the cold winter December days. I love the softness of it - the yarn and the knitting pattern make it soft and warm, and light at the same time.


The earthy colours of the yarn were the thing that attracted me the most to make it.

This was the last gold day of the beautiful autumn we were having this year. The pear tree hasn't lost its leaves yet and the sun rays were actually exude warmth. So beautiful! Hard to believe it was December.


It is hard to hear any birds chirping though, even the parrots are silent - these were the warning signs for the coming winter. How lucky to be prepared with a warm scarf!


Friday, 9 December 2016

Fabric Envelope Tutorial

The most important letter for the whole year is the letter to Santa. We work hard and try to be good to each other,to do good things, to achieve better with the idea to be happy and proud with ourselves, to set a good example to our kids and enter the Holiday season with calmness. 

I made this envelope as a nice gesture of appreciation for my girls - they always write their letters to Santa and believe in the good spirit of Christmas. 

Here is the recipe for making the envelope:

materials needed:

you will find a helpful link to all the HAORI products in the description below: 

* for the face: yarn-dyed Haori fabric size: 27cm x 27cm
* for the lining: yarn-dyed Haori fabric size: 27cm x 27cm
* for the appliqué: pieces from Haori pre-cut quilting size: 7cm x 7cm
* heavy weight fusible interfacing size: 27cm x 27cm
* Haori quilting thread for machine sewing
* embroidery floss
* one decorative button for the closure  
* a pencil, a ruller, a pair of scissors and lots of imagination.

prepare the envelope:

1. Use a regular paper envelope as a template. There are so different shapes and sizes on the market - it would be your personal choice. I chose an envelope from 'Hallmark'. Their envelopes are precisely made and very classy. 


Make a copy of the envelope or use it as it is. I made a copy.

2. On a separate sheet, draw the pattern for the face of the envelope. Cut it out - just the rectangular shape that will have the address and the picture. I could have drawn my picture on the envelope, but I think this way the limitation is more obvious and can not go wild on the drawing. Besides, the small piece is better to use. 


Draw your design as desired. It is absolutely free drawing. I chose to do this winter picture just because it brings memories from my childhood. As a child, I had always drawn a house, an evergreen and a snowmen - every winter in art class, this was my idea of representing winter - mountains of snow, just the way it was.

3. Cut out the pieces for the envelope making:


3.1. Trace the pattern on the fabric, used for lining (green one).  Cut it out, leaving 7 mm seam allowance. Repeat for the fabric, used for the face. 
3.2. Trace the pattern on the heavy weight fusible interfacing. Cut along the lines, without leaving any allowance.

4. Apply the fusible interfacing to the lining with a hot iron, with no steam. 


Steam iron the facing piece to form the edges of the envelope. This will limit your space to work on the appliqué.

5. Time to work on the appliqué on the facing: 

I used small pre-cut pieces of Haori fabric to collect different colours of fabric with different texture, but very similar in tone. I will work on a post for appliqué in details later, after the holidays, but for now I would advise you, if you haven't experienced this type of appliqué, to work with simple shapes (ex. one house) without having so many objects together and just plain snow. The idea is to look like a child's drawing, so anything will work.


I did the houses with machine stitching, leaving the edges very raw. All of the pieces of the snowman I appliquéd by hand, using the slipstitch. 


For all the emboidered details, I used embroidery floss in two strings, except the antennas, where I used one string of embroidery thread. The address I did with my machine, that could stitch letters, but I am really not happy with the result. I would do it differently next time. 

6. Pin the lining and the facing together, making sure that the pieces face each other, wrong sides out. 


7. Sew around the lines that form the envelope. Leave an opening on one of the sides,  since it will be hidden after folding the pattern to shape.

Double stitch all the edges at the folds. 

8. Cut out notches on all folding corners. 


Cut the corners straight, close to the stitched line, making sure you do not cut through the stitching.

This is how it looks when all the excess fabric is removed from the corners, for nicely flattening the shape in the next step.

9. Turn the envelope right side out through the opening, left on the one of the sides. Press with steam, forming all the edges sharp.


10. Slipstitch the opening.


Tailoring:

I love this part of the work! I already can see the product finished and approach the following steps with pure excitement. 

1. Fold into shape of an envelope, following the original paper one we used as a template. Iron press heavily with steam to hold the shape. 


2. At first I was thinking to make a decorative top stitching all around the lines, but when I looked at the envelope, almost finished, I thought that diagonals of the line form such a clean look, I didn't want to ruin it with anything. So, slipstitching it is again. I did the "invisible" stitch on both sides, folding it nicely in place, and with that, the shape was completely formed.


3. Sew the button on the top face side. Attach a small piece of red thread to the body of the envelope. 


The thread goes around the button, closing the envelope.


You better be ready with your letter to Santa, because your envelope is completely done, and ready to be mailed.


I wish you Marry Christmas and that your full list of wishes comes true!

Thanks for working with me! 
♥ IN